
Grey Lynn UFB install (WorldNet, Chorus)
This article has been written by Craig, who in July 2012 had UFB installed at his home in Grey Lynn.
My Ultra Fast Broadband Fibre Internet installation experience (July 2012)
I live in Grey Lynn, Auckland. Several months ago our street was dug up for the installation of fibre optic under the Government’s Ultra Fast Broadband (UFB) programme.
It’s a huge undertaking and involves considerable planning, especially in an old suburb like Grey Lynn where underground services like water, sewage, electricity, phone and gas have been laid (and re-laid) at different times throughout the last 100 years. All these services had to be located and marked above ground on the footpath so the fibre optic could be laid without interfering with them. Footpaths get dug up, lawns get taken away and there is a whole army of workers drilling and digging, and laying bitumen, replacing topsoil and re-seeding grass so that everything can be returned to as it was before. We went away on holiday for a month and the workmen were still in the street when we returned. You will certainly know when fibre is coming to your street!
Current ADSL
I have been an ADSL customer with the Internet Service Provider WorldNet for over six years. The ADSL service has always been good and in recent years my speed during the day has averaged 8-12 Mb/s (but slower at night) and I’ve not needed to use their support.
During the time our street was having fibre laid WorldNet contacted me and asked if I would be interested in upgrading from ADSL to Fibre.
Fibre – speed & pricing
The first nice surprise was that switching to fibre, apart from being much faster, would be cheaper. We already paid Telecom $50 a month for our phone line and $49 a month to WorldNet for our ADSL with a data cap of 60Gb per month. WorldNet Fibre offered us a combined internet and phone service for $79.95 with a download speed of 30Mb/s, upload of 10Mb/s and a data cap of 50Gb. That made it $20 a month cheaper than what we were paying for our existing combined WorldNet ADSL and Telecom line rental.
But we figured that with this extra speed we would probably download or stream more so we instead opted to choose their 100Gb plan which was only an extra $10, making it $89.85 per month – and still $10 a month cheaper than our current ADSL/phone plan.
Another bonus is that toll call rates are much cheaper via fibre – WorldNet charge 4½ cents per minute for NZ tolls or international calls to all the regular countries (UK, USA, Australia, Canada, Ireland, France, Germany, South Korea and China, etc). And their call rate to NZ cell phones is 9.2 cents a minute, which is one-third the 29 cents per minute Telecom charged us. WorldNet also included Caller-ID in the plan.
On top of this, WorldNet offered a 100% free install and a new Linksys wireless modem router. The free install is only available until the end of 2012 after which Chorus (who have the UFB install contract for much of the country) have made no decision about extending the free installation offer.
If fibre is already in your street this free offer might prompt you to make the change now. For our install we had 2½ men here from 8:30am to 5:30pm. I’m glad we didn’t have to pay for their time and materials!
After signing up for fibre, WorldNet contacted us and scheduled the installation for the following week. A few days before that, a technician visited to scope out the work and that gave me a chance to view and discuss the proposed placement of the equipment they would be installing. Ours was to be the first fibre installation in the street.
Day of installation
 - Richmond Road")
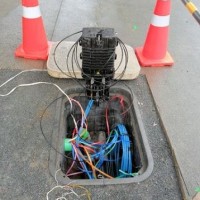
Photo 1: Fibre Access Terminal (FAT) on Richmond Road
Let’s start at Richmond Road, the main street in Grey Lynn. Pictured above in Photo 1 is the Fibre Access Terminal (FAT) on Richmond Road that supplies the fibre connection down our street. The bundles of blue cable are the fibre cables and the other coloured lines are draw-strings that are used to pull the fibre down to each property.
These draw-strings (which are labelled with numbers) are very strong and are just like nylon packing tape and there is one for every two properties. “Our” draw-string is the white one lying on the pavement at the top of the photo, and the technician will attach the fibre cable for our house to this draw-string.
He will also piggy-back a second draw-string to the fibre cable so that when he goes down to outside our house, where the end of our draw-string already lies, he will pull the fibre cable through and also replace the “old” draw-string, with a “new” draw-string, ready for use in the future (such as when our neighbour needs a fibre connection).

Photo 2: Draw-string emerges outside our house
In Photo 2 above we see the green box installed on the pavement outside our house. Generally one box is installed outside every second house in the street. You can see our white draw-string emerging from the trench. Its travelled underground inside a conduit for 120 meters from the Richmond Road FAT shown in the first picture.
You can see the replacement draw-string inside the green conduit that was pulled through with the fibre cable. They will use that draw-string to pull fibre through for our neighbour when they have their installation.
The green box also houses the existing copper telephone wire (POTS) that leads to the outside wall of our house.
The usual procedure is for the fibre cable to be attached to the old copper telephone line and for the technician to go to the house and then pull the old copper wire through until the fibre emerges at the house.
In our case the old underground copper wire would not budge (maybe there was an elbow-join in the underground conduit) so they instead ran a new conduit up the wall to the house with the fibre inside. You can see the new conduit in the picture above, behind the green box.
 outside house")
Photo 3: External Termination Point (ETP) on outside wall of house
In photo 3 above, we see the exposed External Termination Point (ETP) newly installed on the outside of our house with a close-up of the fibre cable, carefully coiled up. The fibre cable drawn in from the street actually comprises two fibre cables (one in reserve) and two pairs of copper cables (more on this later). You can influence where the ETP is placed but it needs to be within easy reach for servicing.
The half-looped conduit contains the incoming black-sheathed fibre optic from the street, and the horizontal conduit contains the white sheathed fibre optic leading to inside the house.
This is an interesting photo because it shows the detail of the fibre cable we have had installed. It is actually a combined hybrid fibre/copper cable (as opposed to a fibre-only cable) and we requested this because we have a second (business) phone line with faxability attached. You can not operate a fax machine over fibre so that was one reason why we still needed the copper wiring. Do keep this in mind if you rely on a fax machine.
Also, although our home phone was going to be switched over to VOIP, we wanted to continue using our existing internal telephone copper wiring network. Our two-storey house is over 100 years old and we have ten (!) telephones on our home line (comprising wired and cordless phones). I did not fancy having to rewire the house.
Incidentally after the install was completed and we had switched over to a fibre VOIP telephone service for our home phone, all of our ten phones in the house still continue to ring – we had wondered if some of the ringers might not have worked because they exceeded the Ringer Equivalence Number (REN) but obviously the ONT supplies enough current to ring all the phones simultaneously.
")
Photo 4: Optical Network Terminal (ONT) unit
The fibre cable from the ETP that is screwed to the outside wall (photo 3) is then run to the Optical Network Terminal (ONT) unit seen above in photo 4.
You need to give some thought as to where the ONT is located inside your home. It needs a 240v mains power supply, and ideally a UPS battery back up because if the mains power fails you will also loose your telephone service.
It was recommended to us that we locate the ONT behind our smart TV so that if in the future there is some developments with Internet TV (wishful thinking!), our ONT is ideally located to take best advantage of the fibre speed for the TV. The dimensions of the ONT unit are 180mm x 120mm x 50mm.
If you do locate the ONT unit behind or near your TV then be sure it is fixed to the wall out of sight, as several of the LED’s on the unit flash constantly and it may be irritating watching TV and have these LED’s blinking in your field of view. Ours is installed just above the skirting board (which you can see in the next photo), hidden from view by the cabinet our TV sits on.
Each ONT unit is registered to the physical address it is installed at, and paired with the specific fibre optic cable that enters your home. The ONT unit will not work at any other address, and a label on the front of the unit asks that it not be removed from the property
")
Photo 5: ONT Unit Wall plate
Above we see the wall plate that the ONT unit shown in photo 4 is affixed to. The white cable pictured on the right rising from the floor is the fibre optic cable running under the house from the ETP.
Fibre from the street to the house is sheathed in black, but once inside your home they switch to using white-sheathed fibre. The yellow cable hanging down on the left is the actual fibre cable waiting to be plugged into the ONT to provide our internet and phone service. The actual connector is out of view, but you can see where it will be plugged into the ONT, in the next photo.
After the photo above was taken the technician ran a CAT5 cable from the ONT Unit’s “GE1” socket (see next photo), to our study where we wanted the internet modem to be located.

Photo 6: ONT connections
Above we see the available connections on the ONT unit. On the left “POTS1” is our home telephone line connection and the cable that will plug in here runs back to the ETP so it can be connected up to our existing internal copper wire telephone network. “POTS2” is a spare for a second phone line.
We asked that our internet connection terminate in our study so the technicians ran a cable from “GE1” down under the house to our study, where they installed a Keystone RJ45 jack point, into which we plugged the wireless modem router that WorldNet supplied.
GE2/3/4 are reserved for future use – internet TV maybe?? (or a flatmate with a different ISP)
The ONT is powered by a 12v 1A power adapter. So if you don’t have a UPS then maybe a Gel Cell could be used in an emergency.
The fibre cable from the street reaches its final destination when it is connected to the ONT unit on the far right – by the yellow triangle warning symbol.

Photo 7: The Prize!
Okay so we are all connected now. Here the Speedtest.net website shows our fibre connection speed – 63.87 Mbps download, and 35 Mbps upload! This speed remains steady day and night. We are on a 30Mbps download/10Mbps upload plan, but currently Chorus is not throttling the speed – this will no doubt change when more connections are made. For an extra $30 a month you can have 100Mbs download speed.
A point to note is that it can take several hours for your new fibre internet connection to settle down once it is commissioned, so do not be alarmed if your initial download speed is no faster than your ADSL speed, for the first couple of hours, or even overnight.
Conclusions
I am extremely pleased with the results and the whole installation procedure. WorldNet did an outstanding job in arranging all the work necessary to switch us from ADSL to fibre and they took care of seamlessly switching out telephone service from Telecom.
Throughout the day of the installation WorldNet called to check on progress and to make sure there were no problems, and then when the install was coming to an end one of their staff arrived with a new Linksys wireless modem, all pre-configure with my existing user name and password. I simply had to plug in the modem and I was all ready to go.
I was surprised how long the install took but this had more to do with the high standard of workmanship the Chorus technicians worked to – they had a real determination to ensure the fibre was safely and securely installed; it will after all be there for a very long time.
They are very safety conscious and when I said I wanted to be able to take photo’s of the install and generally ask questions I had to sign their Health and Safety forms and promise not to touch their equipment or stare down the fibre optic cable!
Technicians need access to your house (and under your house) throughout the install so if you can manage it then you or a family member should be onsite for the install and be available to give an opinion on where you want the equipment installed.
Only a very few ISP’s are currently offering fibre internet services in Auckland, if fibre is in your street, or will be, then you should seriously consider having it installed. I’m pleased I did.
Source: Craig (Gustov) – Geekzone [View forum post and discussion]